
Text Output
Printing text is a time-honored debugging method. It’s often frowned
upon as primitive, unfocused, or non-interactive, but printing has
advantages:
- The information is all there, so you can go forward or backward in (run) time, scanning for information.
- You do not have to manually step through or pause your program to look at values.
- Sometimes you can find timing-dependent or rare problems that you would not see using a debugger.
We have introduced print, but print is
awkward and requires you to open the console. Sometimes, it would be
nice to put the text output right on the page with your canvas.
hprint
I’ve written a small library for displaying debugging output to the browser. It is called hprint, short for “html print” (maybe you can think of a better name). Here are the functions you can use:
hprint(a, b, c, ...)— convert arguments to strings and print them with one space separation.hprintln(a, b, c, ...)is identical tohprint()except that it prints a newline after printing the arguments.hlines— restrict the number of lines to appear; ifnis negative (the default), there is no restriction.hprecision(d)— Print floating point numbers with up todplaces to the right of the decimal point. Ifdis negative (the default), numbers are printed using the default toString() method.createHlines(width, height)— specifies output size in
pixels. This is not required, but if called, output will appear in a
scrollable box. The default is to simply add text to the bottom of the
page, which can grow arbitrarily unless restricted by a call tohlines().removeHlines()— removes all output. Output may be resumed. To resume output to a scrollable box, call createHlines() again.
Examples
hprint("Hello World")— prints"Hello World\n"hprint(3, 2, 1, 'go')— prints"3 2 1 go"hprint("" + 3 + 2 + 1 + 'go')— prints"321go"hprecision(3); hprint(12.0, 1.23456)— prints"12 1.234"
Here is an animated gif (you may have to click it to see it run). See below for how to use hlines.js in your programs.
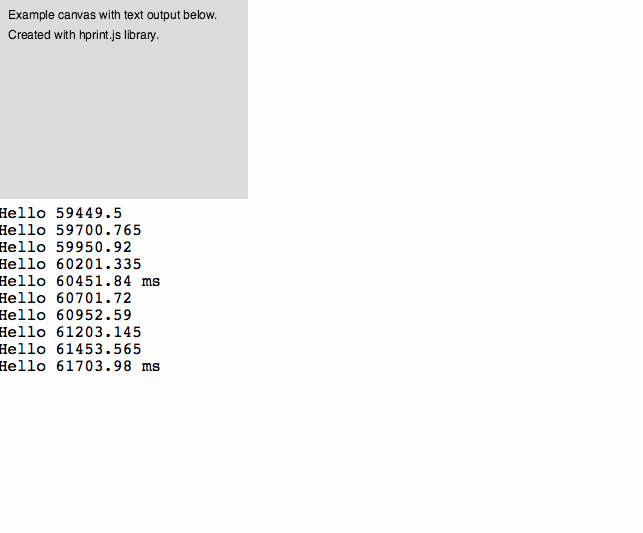
The code that created this is the following:
1 2 3 4 5 6 7 8 9 10 11 12 13 14 15 16 17 18 19 20 21 22 23 24 25 26 27 28 29 30 31 32 33 34 | function setup() { createCanvas(250, 200); background(220); text("Example canvas with text output below.", 10, 20); text("Created with hprint.js library.", 10, 40); frameRate(4); hlines(10); // only keep last 10 lines of output hprecision(3); // print numbers limited to 3 decimal places } var count = 0; function draw() { // hprint() does not print a newline: if (count % 5 == 0) { hprint("Hello", millis()); hprintln(" ms"); } else { // hprintln() prints arguments followed by newline: hprintln("Hello", millis()); } // Every 20 lines, we switch output style between scrolling box and // output direct to the page. if (count % 20 === 0) { removeHlines(); // remove all hprint output if (count < 20) { createHlines(500, 100); // print into scrolling text box hprintln("Output into a bounded scrolling box."); } else { hprintln("Output directly to the HTML page."); } hprintln("The number of lines can be unlimited, but here is limited to 10."); } count = (count + 1) % 40; } |
Using hprint in your code
First, download the hprint.js file and put it in the same directory as your sketch.
Second, add a line to your .html file to load hprint.js, using the
following as a guide. Notice line 9 with “hprint.js” — just add this
line to your .html file:
1 2 3 4 5 6 7 8 9 10 11 12 13 14 | < !DOCTYPE html> <html> <head> <meta charset="UTF-8"/> <title>hprint</title> <script src="http://cdnjs.cloudflare.com/ajax/libs/p5.js/0.4.9/p5.js"></script> <script src="https://cdnjs.cloudflare.com/ajax/libs/p5.js/0.4.9/addons/p5.dom.js"></script> <script src="https://cdnjs.cloudflare.com/ajax/libs/p5.js/0.4.9/addons/p5.sound.js"></script> <script src="hprint.js" type="text/javascript"></script> <script src="sketch.js" type="text/javascript"></script> </head> <body> </body> </html> |